How to add a watermark in your pictures for free

This is a post that I want to write to avoid forgetting the process to include a watermark to a picture using Gimp software for Mac.
Why using a watermark in your pictures?
To protect your pictures from being used by someone that has not the rights to this picture you can add a watermark with the right level of opacity to avoid that someone else on the internet uses that picture.
Also, you can use it to reinforce the brand name in your product/service because the potential clients will see your brand and will notice that your product is unique to your company, so a good candidate for your watermark is using the logo of your company for instance.
Gimp as an images editor program
Gimp is a cross-platform open-source software application to edit all kinds of images. You can find out the source code of in GitHub in the following url direction.
There are other alternatives to Gimp in the market more known like Adobe Photoshop, Canva for enterprise, Pixlr … but for adding a watermark in our pictures Gimp fits our needs.
How to add a watermark with Gimp
1 - Download Gimp software from www.gimp.org
2 - Install Gimp on your computer.
3 - Open Gimp after the installation has been successful.

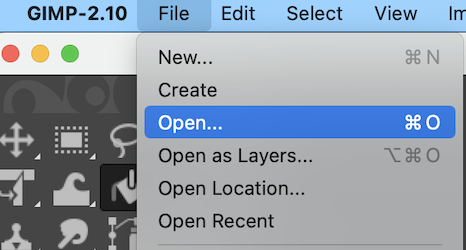
4 - Open the picture that you want to protect with Gimp. File > Open

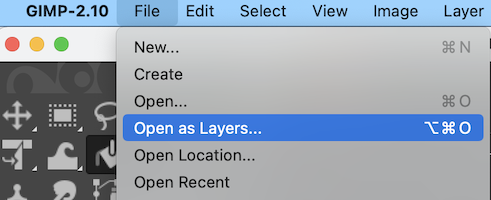
5 - Open the second image that you want to use as a watermark using File > Open as a layers

6 - Move the picture on the screen and set it wherever you want (I like to set it in the center of the picture)
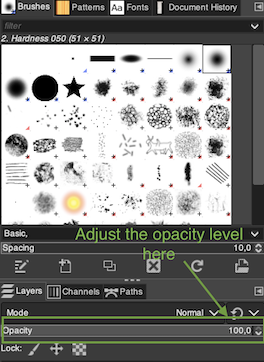
7 - Now in the right toolbar there is a word that says Opacity. There you can decrease the opacity from 100% to 0%.

8 - Once you are comfortable with the level of Opacity you have to merge the two layers.

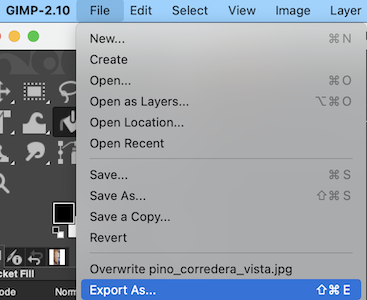
9 - Then, you can export the picture with the watermark to a jpeg, png, or whatever another image format that you want using File > Export as selecting the file type that you want to use.

Conclusion
That’s it, if you need to add a watermark to your pictures I hope this post was useful for you.

Comments